Weekly Round Table
A Brief Introduction to Three.js
By Vittorio Retrivi
What is WebGL?
WebGL is a low-level JavaScript API that renders triangles in a canvas at a remarkable speed. It's compatible with most modern browsers, and it's fast because it uses the Graphic Processing Unit (GPU) of the visitor.
The Instructions that WebGL sends to the GPU are called shaders.
This shaders are written in GLSL (OpenGL Shading Language). A language that is very similar to C.
How it Works?
Any object in a 3D virtual world is composed of triangles which in turn are composed of 3 vertices.
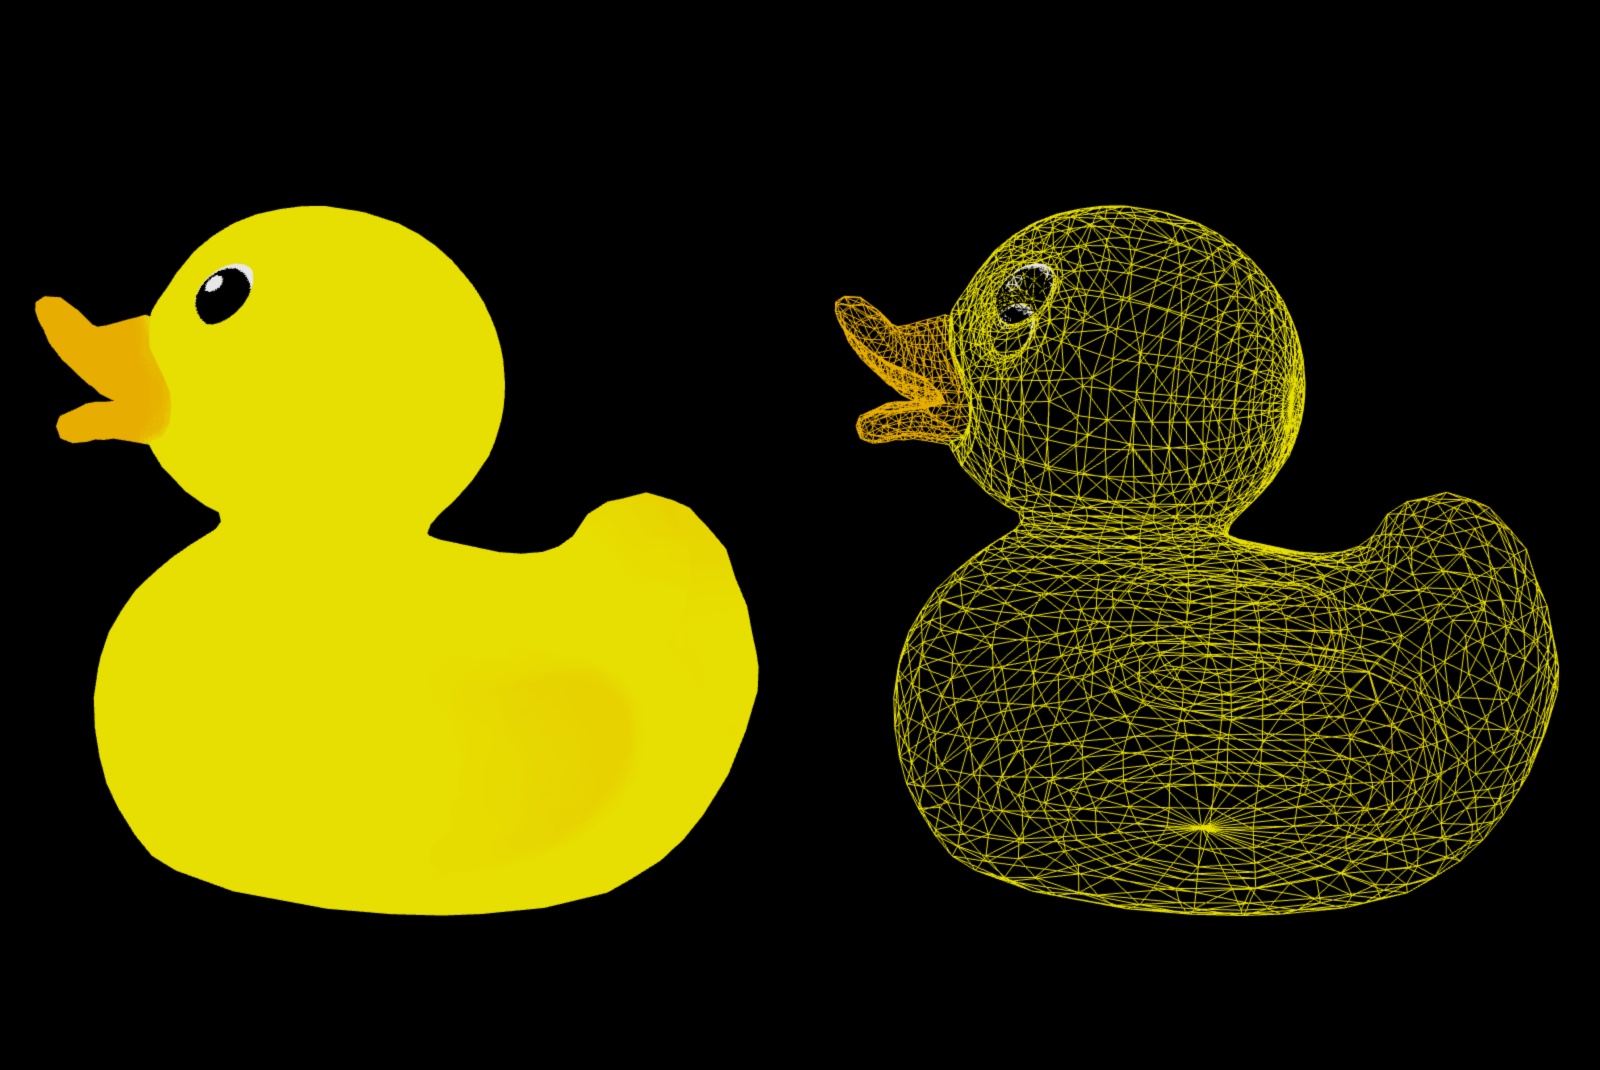
Imagine that you want to render a 3D object and this object is constituted of 1000 triangles. Each triangle includes 3 points.
1. Vertex Shader
When we want to render our object, the GPU will have to calculate the position of these 3000 points. Because the GPU can do parallel calculations, it will handle all the points points in one raw.
2. Fragment Shader
Once the object's points are well placed, the GPU needs to draw each visible pixel of those triangles. Yet again, the GPU will handle the thousands and thousands of pixels calculations in one go.
Three.js
What is Three.js?
- Three.js is a JavaScript library under MIT license that works right above WebGL.
- The library's goal is to drastically simplify the process of creating a 3d web experience.
- Because Three.js is right above WebGL, we can still interact with it in some ways.
Showcase
Installation
npm install three
Basic Setup
HTML
<html>
  <head>
    <meta name="viewport" content="width=device-width, initial-scale=1.0" />
    <title>A Brief Introduction to Three.js</title>
  </head>
  <body>
    <canvas class="webgl"></canvas>
    <script src="script.js"></script>
  </body>
</html>
JavaScript
import * as THREE from "three";
const canvas = document.querySelector(".webgl");

/* Setup code goes here */

const tick = () => {
  /* Loop code goes here */
  requestAnimationFrame(tick);
};

tick();
🚧 Building a Scene 🚧
What is a Scene?
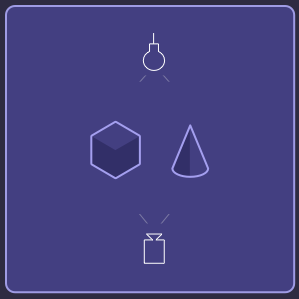
Scenes allow you to set up what and where is to be rendered by three.js. This is where you place objects, lights and cameras.
const scene = new THREE.Scene();
🎥 Adding a Camera
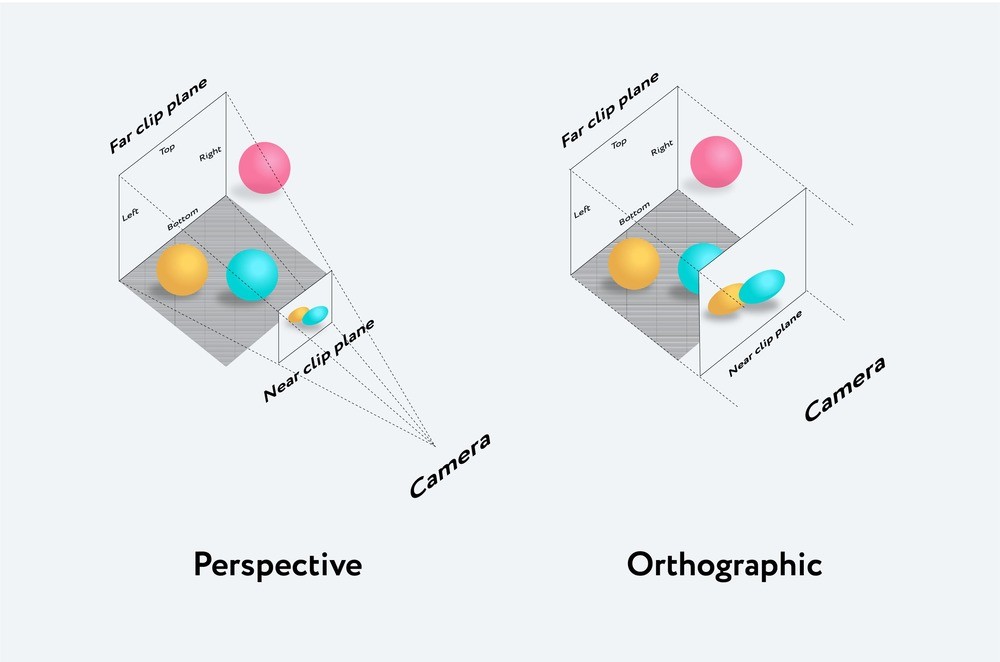
Perspective camera
The perspective camera is designed to simulate what the human eye sees. The camera perceives all objects in a perspective projection: the further the object is, the smaller it seems.
Orthographic camera
In this projection mode, the size of the object remains constant, regardless of its distance from the camera. If we move the camera, the lines and objects will not be distorted.
const camera = new THREE.PerspectiveCamera(75, 16 / 9, 0.1, 100);
camera.position.set(3, 3, 1);
camera.lookAt(0, 0, 0);

scene.add(camera);
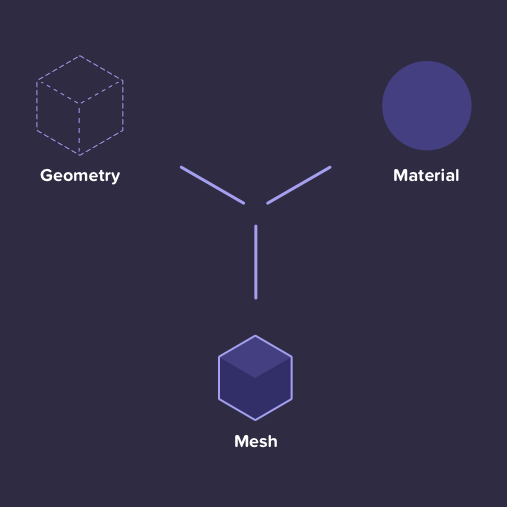
Adding an Object (mesh)
Mesh
It is a class representing triangular polygon mesh based objects.
Iss the combination of a geometry (the shape) and a material (how it looks).
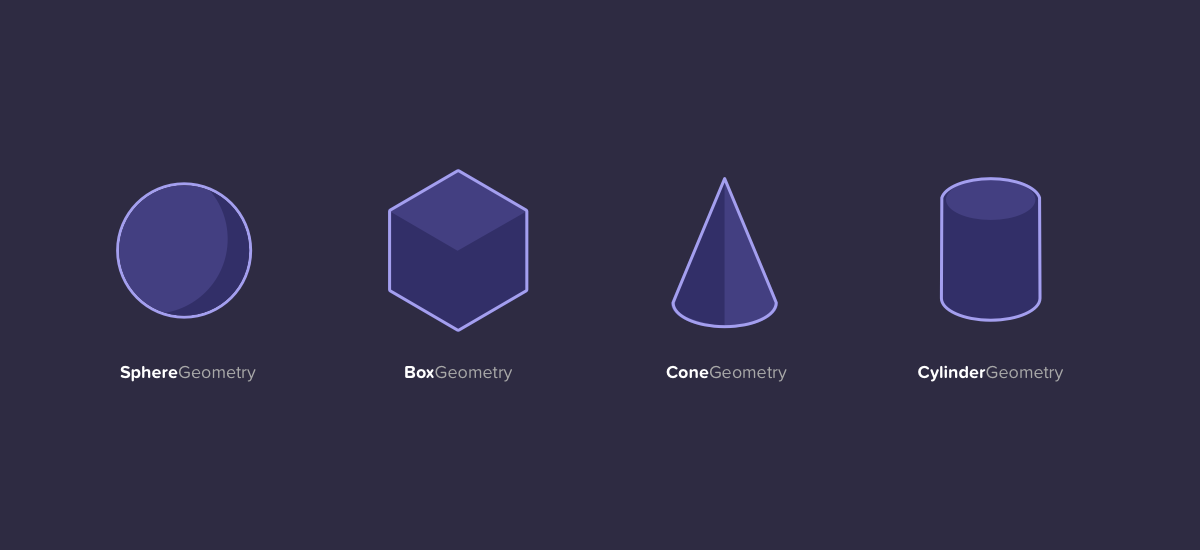
📐 Geometry
A geometry is the mathematical formula of an object. It gives us the vertices of the object we want to add to the scene.
Some built-in geometries:
- BoxGeometry
- ConeGeometry
- CylinderGeometry
- DodecahedronGeometry
- OctahedronGeometry
- PlaneGeometry
- SphereGeometry
- TetrahedronGeometry
- TorusGeometry
const sphereGeometry = new THREE.SphereGeometry(0.5, 384, 384);
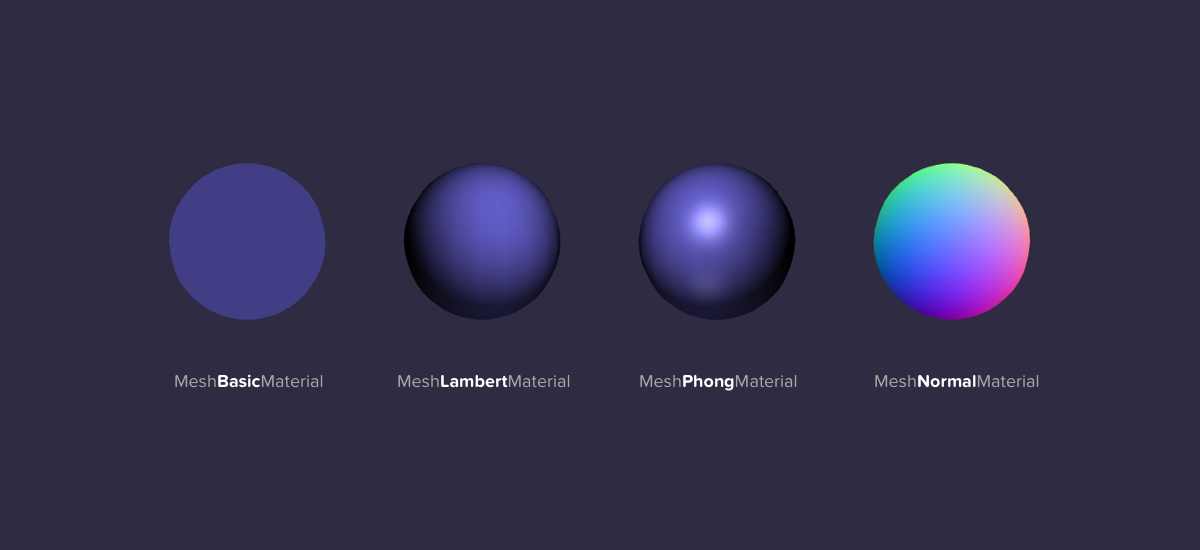
👩🎨 🎨 Material
A material can be defined as the properties of an object and its behavior with the light sources of the scene. Simply put, materials describe the appearance of objects.
Some built-in materials:
- MeshBasicMaterial
- MeshLambertMaterial
- MeshMatcapMaterial
- MeshNormalMaterial
- MeshPhongMaterial
- MeshPhysicalMaterial
- MeshStandardMaterial
- MeshToonMaterial
const sphereMaterial = new THREE.MeshBasicMaterial({
  color: 0x00caaf,
});
Putting all Together
// Geometry
const sphereGeometry = new THREE.SphereGeometry(0.5, 384, 384);

// Material
const sphereMaterial = new THREE.MeshBasicMaterial({
  color: 0x00caaf,
});

// Mesh = Geometry + Material
const sphereMesh = new THREE.Mesh(sphereGeometry, sphereMaterial);
sphereMesh.position.set(0, 1.5, 0);

scene.add(sphereMesh);
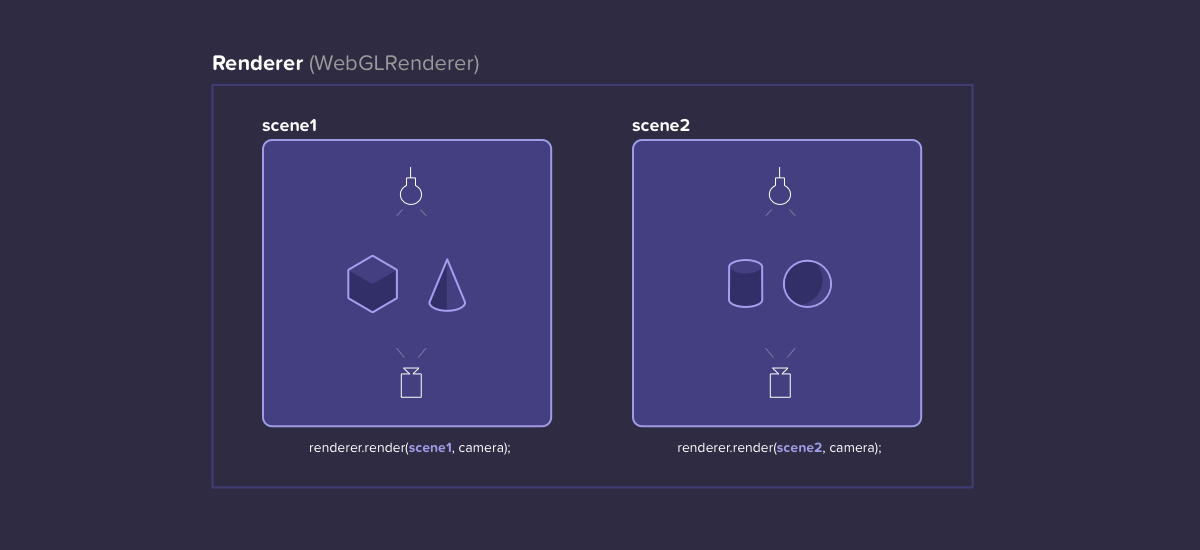
🖼 Render the Scene
The renderer's job is to do the render. 😉
We will simply ask the renderer to render our scene from the camera point of view, and the result will be drawn into a canvas.
const renderer = new THREE.WebGLRenderer({
  canvas: canvas
});
const tick = () => {
  // render the scene
  renderer.render(scene, camera);

  requestAnimationFrame(tick);
};

tick();
Full Code
import * as THREE from "three";
const canvas = document.querySelector(".webgl");

// Scene
const scene = new THREE.Scene();

// Camera
const camera = new THREE.PerspectiveCamera(75, 16 / 9, 0.1, 100);
camera.position.set(3, 3, 1);
camera.lookAt(0, 0, 0);

scene.add(camera);

// Geometry
const sphereGeometry = new THREE.SphereGeometry(0.5, 384, 384);

// Material
const sphereMaterial = new THREE.MeshBasicMaterial({
  color: 0x00caaf,
});

// Mesh = Geometry + Material
const sphereMesh = new THREE.Mesh(sphereGeometry, sphereMaterial);
sphereMesh.position.set(0, 1.5, 0);

scene.add(sphereMesh);

// Renderer
const renderer = new THREE.WebGLRenderer({
  canvas: canvas
});

// Loop Function
const tick = () => {
  // render the scene
  renderer.render(scene, camera);

  requestAnimationFrame(tick);
};

tick();
🏃 Going Further 🏃
Let's Update Some Things
Physically based rendering (PBR) is a computer graphics approach that seeks to render images in a way that models the flow of light in the real world. Many PBR pipelines aim to achieve photorealism. 🔗
MeshStandardMaterial is a standard physically based material, using Metallic-Roughness workflow.
// Geometry
const sphereGeometry = new THREE.SphereGeometry(0.5, 384, 384);

// Material
const sphereMaterial = new THREE.MeshStandardMaterial({
  color: 0x00caaf,
  roughness: 0,
  metalness: 0.75,
});
// const sphereMaterial = new THREE.MeshBasicMaterial({ color: 0x00caaf });

// Mesh = Geometry + Material
const sphereMesh = new THREE.Mesh(sphereGeometry, sphereMaterial);
Hmm, it's a bit dark here...
Let's add some lights
💡 Adding a Source of Light
Some built-in lights:
- AmbientLight
- DirectionalLight
- HemisphereLight
- PointLight
- RectAreaLight
- SpotLight
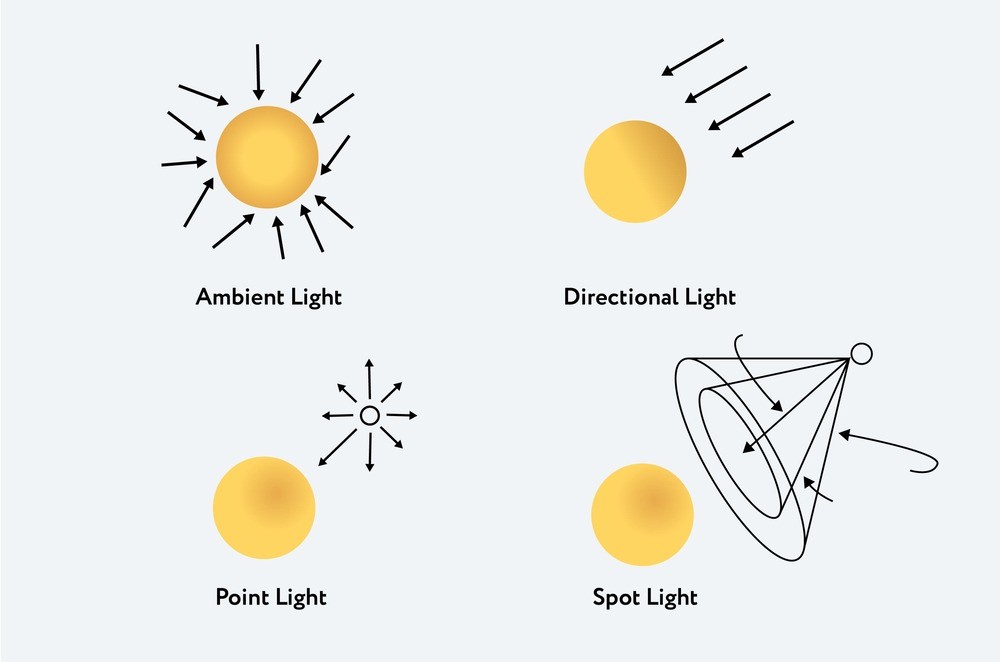
🌞 Ambient Light
const ambientLight = new THREE.AmbientLight(0xffffff, 0.5);

scene.add(ambientLight);
💡 Point Light
const pointLight = new THREE.PointLight(0xffc83f, 32);

scene.add(pointLight);
const clock = new THREE.Clock();

const tick = () => {
  const elapsedTime = clock.getElapsedTime();

  pointLight.position.x = Math.sin(elapsedTime) * 2;
  pointLight.position.z = Math.cos(elapsedTime) * 2;

  // ...
};

tick();
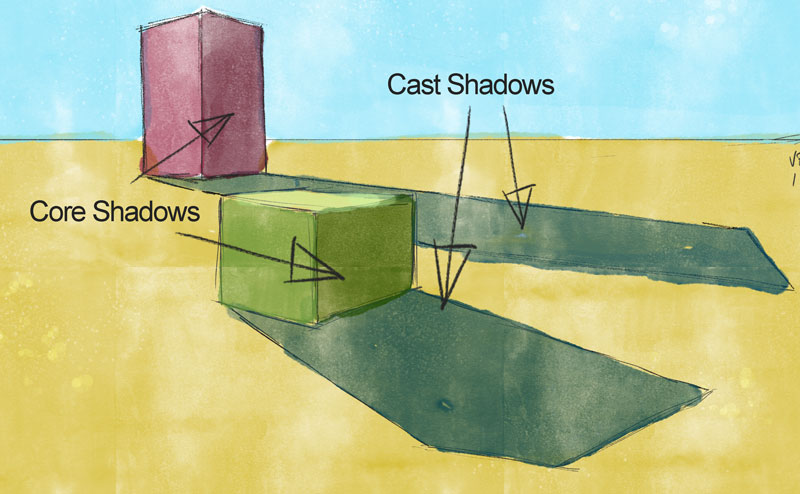
Shadows
Core shadows vs cast shadows
The core shadow is the dark band visible where light and shadow meet. It is the point at which light can no longer reach the form to illuminate it. It is the darkest area of the object.
The cast shadow is the shadow on the surface that the object rests on. It is created by the object itself blocking the light from the light source.
Activating Cast Shadows
1. We activate the shadow maps on the renderer
const renderer = new THREE.WebGLRenderer({
  canvas: canvas,
});

renderer.shadowMap.enabled = true;
2. Then we decide wich lights will cast shadows.
const pointLight = new THREE.PointLight(0xffc83f, 32);

pointLight.castShadow = true;
3. Finally we decide which objects will cast shadows and which will receive them.
const sphereMesh = new THREE.Mesh(sphereGeometry, sphereMaterial);

sphereMesh.castShadow = true;
const floorMesh = new THREE.Mesh(floorGeometry, floorMaterial);

floorMesh.receiveShadow = true;
Adding an Environment Map
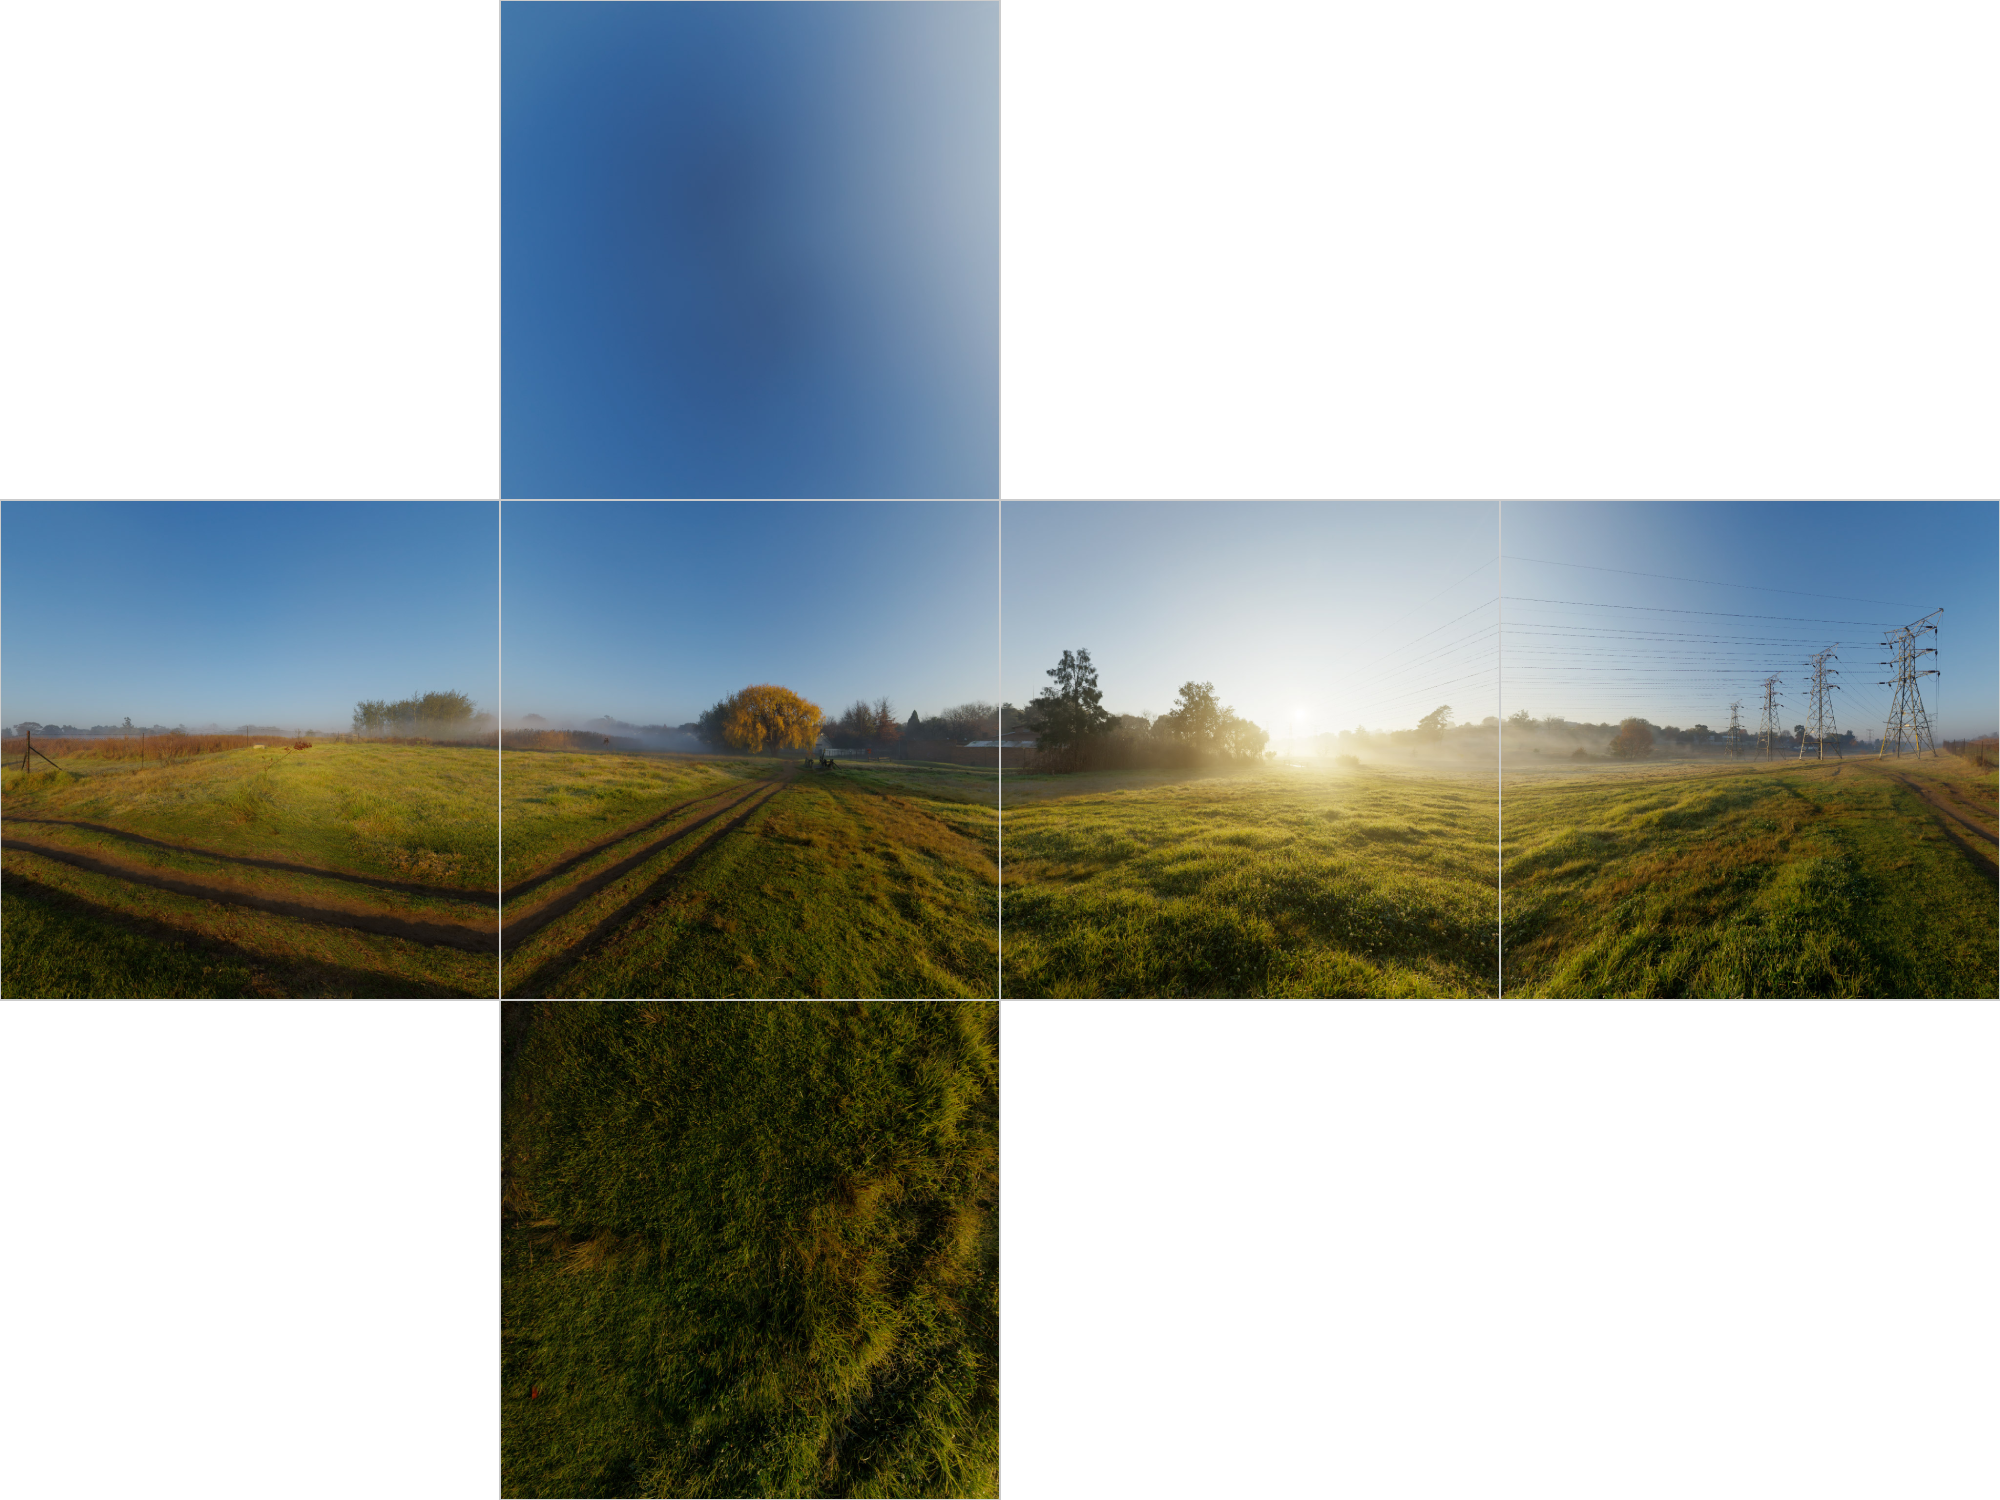
1. Loading the environment map texture
const cubeTextureLoader = new THREE.CubeTextureLoader();

const environmentMap = cubeTextureLoader.load([
  "/assets/textures/environmentMap/px.jpg",
  "/assets/textures/environmentMap/nx.jpg",
  "/assets/textures/environmentMap/py.jpg",
  "/assets/textures/environmentMap/ny.jpg",
  "/assets/textures/environmentMap/pz.jpg",
  "/assets/textures/environmentMap/nz.jpg",
]);
2. Setting the environment map on the scene
// Sets the background used when rendering the scene
scene.background = environmentMap;
// Sets the texture as the env map for all physical materials in the scene
scene.environment = environmentMap;
Loading Textures
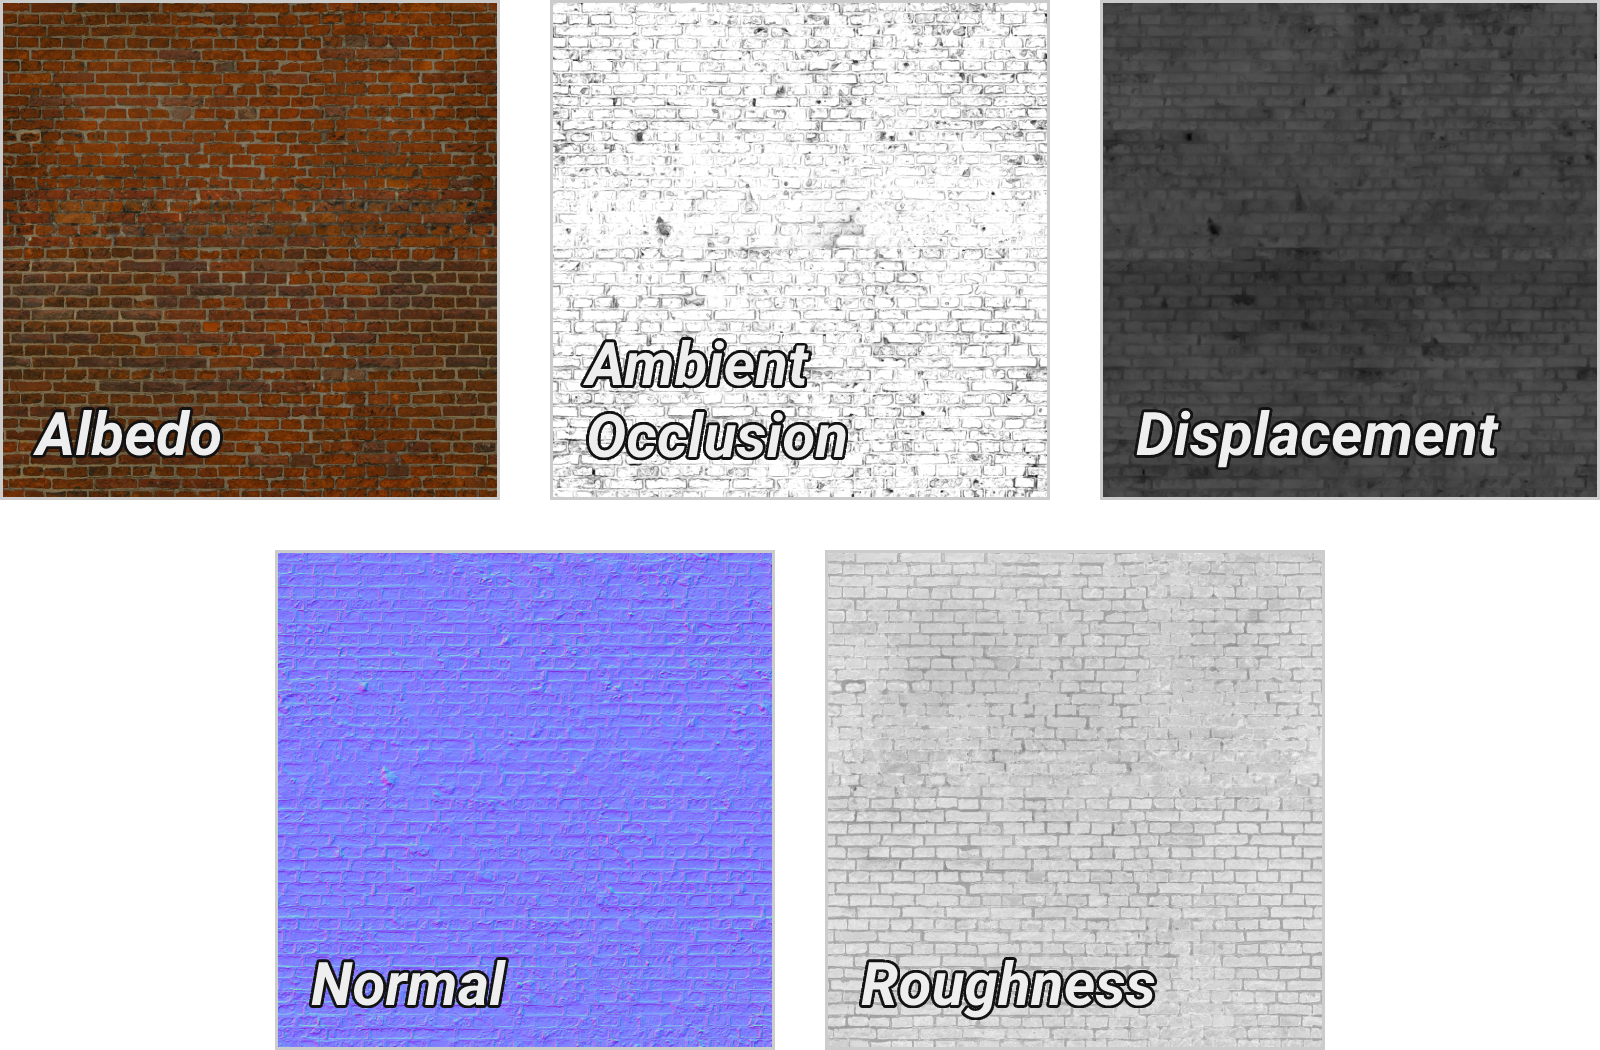
1. Loading the textures
const textureLoader = new THREE.TextureLoader();

const color = textureLoader.load("/assets/textures/bricks/color.jpg");
const normal = textureLoader.load("/assets/textures/bricks/normal.jpg");
const roughness = textureLoader.load("/assets/textures/bricks/roughness.jpg");
const displacement = textureLoader.load("/assets/textures/bricks/displacement.jpg");
const ao = textureLoader.load("/assets/textures/bricks/ao.jpg");
2. Updating the material with the textures
const sphereMaterial = new THREE.MeshStandardMaterial({
  //color: 0x00caaf,
  //roughness: 0,
  //metalness: 0.75,

  map: color,
  normalMap: normal,
  roughnessMap: roughness,
  displacementMap: displacement,
  aoMap: ao,
});
👩🏻🔬 Advanced Techniques 🧪
Shaders
Vertex Shader
The vertex shader's purpose is to position the vertices of the geometry. The idea is to send the vertices positions, the mesh transformations (like its position, rotation, and scale), the camera information (like its position, rotation, and field of view) and then
The GPU will follow the instructions in the vertex shader to process all of this information in order to project the vertices on a 2D space that will become our render (our canvas).
When using a vertex shader, its code will be applied on every vertex of the geometry. The vertex shader happens first. Once the vertices are placed, the GPU knows what pixels of the geometry are visible and can proceed to the fragment shader.
Example of a Custom Vertex Shader
uniform float uTime;
uniform float uTimeVelocity;
uniform vec2 uFrequency;
uniform float uAmplitude;
uniform float uXMovement;

varying vec2 vUv;

void main() {
  vUv = uv;
  vec3 pos = position.xyz;

  pos.z += sin(uv.x * uFreq.x - (uSpeed * uTime)) * uAmp * uv.x * uXMovement;
  pos.z += sin(uv.y * uFreq.y - (uSpeed * uTime)) * uAmp * uv.x;

  gl_Position = projectionMatrix * viewMatrix * modelMatrix * vec4(pos, 1);
}
Fragment Shader
The fragment shader purpose is to color each visible pixel (fragment) of the geometry. The same fragment shader will be used for every visible pixel (fragment) of the geometry.
Example of a Custom Fragment Shader
varying vec2 vUv;
uniform float uTime;

#define PI 3.14159265358979

float cnoise(vec3 P) {
  // Classic Perlin 3D function
}

void main() {
  vec2 displacedUv = vUv + cnoise(vec3(vUv * 10.0, uTime * 0.5));
  float strength = cnoise(vec3(displacedUv * 10.0, uTime * 0.5));

  float red = strength * 0.75 + 0.2;
  float green = 0.0;
  float blue = strength * 0.2 + 0.2;

  gl_FragColor = vec4(red, green, blue, 1.0);
}
Post-processing
Baking
Baking to texture is the process of approximating complex surface effects as simple 2D bitmaps and then assigning them to objects. By creating a library of 'baked' texture maps, 3D visual effects on objects can be rendered in real time without having to recalculate elements such as materials, lighting, and shadows.
📚 Keep Learning! 📚
Resources
- Three.js Docs (suggested by copilot)
- Three.js Journey by
- Shaders For Game Devs by
- The Book of Shaders by
- React Three Fiber, a React renderer for Three.js
- drei, useful helpers for RTF
- react-postprocessing, postprocessing for RTF